
Santa Clarita Outdoor Kitchens: Project example: a 14-foot L-shaped outdoor kitchen with a grill, an outdoor refrigerator and a sink on an existing Valencia patio — what it looks like and what it costs
Santa Clarita Outdoor Kitchens walks through a typical full-kitchen project for a two-story Valencia tract home: a 14-linear-foot L-shaped island set on the existing concrete patio, a 36-inch built-in gas grill on the long leg, an outdoor-rated refrigerator and a prep sink on the short leg, and a countertop that turns the corner into a serving ledge facing the lawn.
Bookings aren't open yet. Leave your name and number; your message is recorded, and you'll get one message when a local installer is available.
Project Examples & Typical Prices
Worked example. The pictures are AI concept illustrations, not photographs; no installation was performed or arranged through this site; prices are typical Santa Clarita Valley market ranges, not quotes.
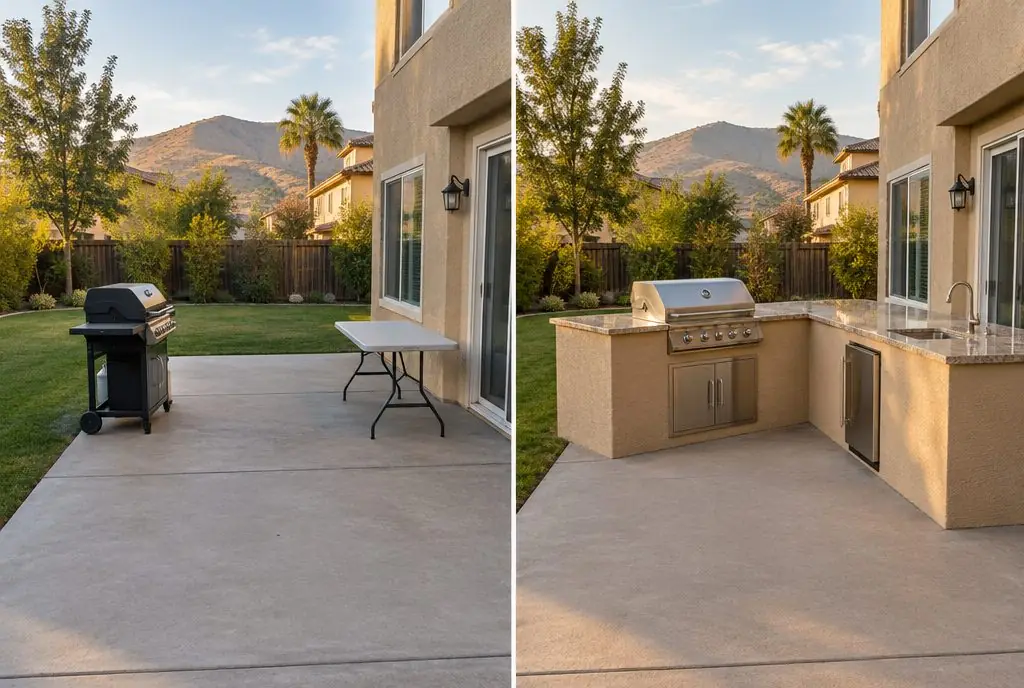 Illustration
Starting pointFinished layout (concept)
Illustration
Starting pointFinished layout (concept)
The scenario
The house is a two-story tract home in one of Valencia's planned villages, with a rectangular backyard, a lawn, a block wall on three sides and a 14-by-20-foot concrete patio poured with the house. Cooking happens on a cart grill that lives against the wall, everything is carried back and forth through the kitchen slider, and the goal is to move the cooking, the cold drinks and the cleanup outside. The patio is level and in good shape, with no cracks wider than a hairline, and the gas meter sits on the side of the house about 30 feet from where the grill would go.
The brief is a full-size outdoor kitchen without a new slab: an L-shaped island about 14 linear feet in total, a 36-inch built-in gas grill, an outdoor-rated refrigerator, a sink for rinsing and prep, and enough counter on both sides of the grill to land platters. The short leg of the L faces the lawn so whoever is cooking can talk to the people sitting there. The house has a hose bib and a sewer cleanout on the same side as the patio, which makes the sink realistic.
The starting conditions at a glance:
- Patio: existing level concrete slab, about 14 by 20 feet
- Gas: meter on the side of the house, roughly 30 feet away
- Water: hose bib on the patio side of the house
- Power: one exterior outlet near the slider, not on a dedicated circuit
- Layout goal: grill on the long leg, fridge and sink on the short leg facing the lawn
What the job involves
- The layout is chalked on the patio at full size, with the grill centered on the long leg, at least a counter's width of landing space on each side, and the refrigerator and sink on the short leg; the walk path from the slider to the island is checked so nobody has to squeeze past the grill.
- The slab is checked for level and soundness, and the island frame is assembled from galvanized steel studs or laid up in concrete block, with cutouts sized exactly to the grill, refrigerator and sink specifications, including the ventilation openings the grill manual calls for.
- Utility runs are roughed in before the island is closed: a gas line is trenched from the meter and stubbed up inside the grill bay with a shutoff valve, a supply line and drain are routed to the sink bay, and an outdoor circuit with GFCI protection is run for the refrigerator and outlets.
- The frame is skinned with cement backer board, the seams are taped and the island is finished in stucco to match the house, with a stone veneer band at the base where sprinklers and dogs hit the island most.
- The countertop is templated, then installed in two pieces joined at the corner, with an overhang on the lawn side supported by hidden steel brackets and a cutout for the undermount sink.
- The grill, the refrigerator and the sink are set and connected, the gas connection is leak-tested, the water and drain are run, and the refrigerator is checked on its own circuit; the patio is washed down and cleared of stucco spatter.
Hardware and materials
- Galvanized light-gauge steel stud frame or concrete block, with cement backer board on every face
- Stucco finish to match the house, plus a stone veneer band at the base
- Granite or porcelain countertop in two pieces, with hidden steel overhang brackets
- 36-inch built-in gas grill with an insulated jacket if the island frame calls for one, and access doors below
- Outdoor-rated under-counter refrigerator with front ventilation
- Stainless undermount prep sink, faucet, supply line, P-trap and drain line
- Gas line from the meter with a shutoff valve at the island; outdoor GFCI-protected circuit
What it typically costs in the Santa Clarita Valley
| Custom L-shaped island, 14 linear feet of island installed ($800–$1250 per foot) | $11,200–$17,500 |
| Built-in gas grill (30–36 in) | +$1,500–$4,500 |
| Outdoor-rated refrigerator | +$1,200–$2,800 |
| Sink with plumbing | +$1,500–$3,500 |
| Typical total | $15,400–$28,300 (market range, not a quote) |
These are typical local ranges, not a quote or an offer; an installer prices the actual job after seeing the wall.
Add-ons often paired with this job
- Side burner — +$400–$900. A side burner beside the grill handles a pot of corn or a sauce without running back inside, and it shares the same gas run.
- Raised bar-top seating — +$1,200–$3,000. Raising the lawn-side ledge to bar height adds seating for three or four stools and hides the prep area from the lawn.
- Granite or quartz countertop upgrade — +$1,500–$4,000. Upgrading from a standard countertop to a thicker granite or quartz slab changes the look more than any other single choice.
Why it is done this way
An L-shaped island is the natural choice when there is room for a grill plus two appliances. Keeping the grill on the long leg and the cold and wet zones on the short leg separates the hot work from the prep work, and the corner becomes a natural serving point. Building on the existing slab saves a new pad, but only because this slab is level, sound and thick enough; the check comes first, not after the frame is up.
The utilities are roughed in before the island is skinned because opening a finished island to add a gas line or a drain is the most expensive change in this kind of project. The insulated jacket question depends on the grill and the frame: many grill makers require one when the island has combustible parts, and a steel-stud island with backer board still follows the maker's instructions.
What a stucco island trades against a stone-clad one:
- Stucco matches the house and costs less per foot, but shows chips at the base over time.
- Stone veneer hides wear and reads as more substantial, at a higher material and labor cost.
- A stone band at the base with stucco above gets most of the durability for a fraction of the stone cost.
What would change the price
- The slab turns out to be thin or cracked under the island footprint — a new pad or thickened footing changes the site-condition rate.
- The gas meter is on the far side of the house — a longer trench and a larger pipe size raise the gas line item.
- The sink drain cannot reach the house line by gravity — a pump or a different drain arrangement adds cost and time.
- A second appliance on the short leg, such as an ice maker or a beverage center, needs its own cutout and power.
- A permit is needed for the gas line and electrical work — fees, where they apply, are outside the estimator's ranges.
Where this leads
- Service page: L-Shaped Outdoor Kitchen — Two legs at a right angle: one for cooking, one for prep or bar seating — the most popular layout in the valley.
- Local page: Outdoor kitchens in Valencia
- All services and typical prices: outdoor kitchen in Santa Clarita
- More worked examples: Project Examples & Typical Prices
Check availability and the price range for this setup
Bookings aren't open yet — describe the island and you get a Santa Clarita price range right here. Typical Santa Clarita Valley installed prices for a built-in outdoor kitchen island, structure and countertop, appliances listed separately. This is a market estimate, not a quote. Permit fees, HOA fees and utility company charges, where they apply, are not included.